https://www.tp-link.com/us/support/faq/14/
https://www.sas.upenn.edu/~jasonrw/IPConfiguration.htm
https://kb.netgear.com/27476/How-do-I-set-a-static-IP-address-in-Windows
https://www.howtogeek.com/howto/19249/how-to-assign-a-static-ip-address-in-xp-vista-or-windows-7/
https://www.sas.upenn.edu/~jasonrw/IPConfiguration.htm
https://computers.tutsplus.com/tutorials/how-to-change-your-dns-for-safer-faster-browsing--mac-61232
LAB- 2
Choose your computer’s operating system.


Step 1
Click Start->Control Panel->select and double click Network and internet connections->select and double click Network Connections.
Step 2
Double-click the Local Area Connection icon; highlight Internet Protocol (TCP/IP) tab in the Local Area Connection Properties window that appears:
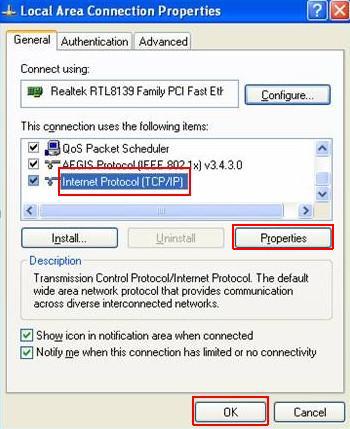
Step 3
Double click it or click Properties. The TCP/IP Properties window will display.
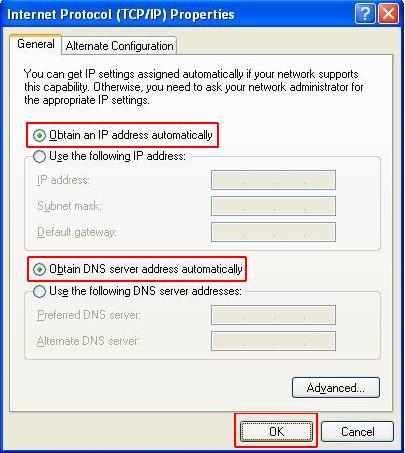
Step 4
Now you have two ways to configure the TCP/IP protocol below:
1. Assigned by DHCP Sever
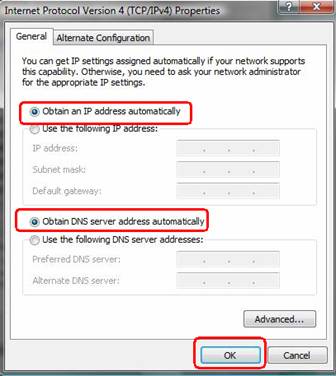
Select Obtain an IP address automatically and Obtain DNS Server address automatically, as shown in the figure below. These may be selected by default. Then click OK to save setting.
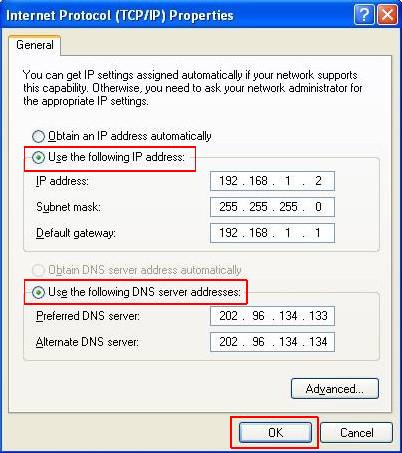
2.Assigned manually
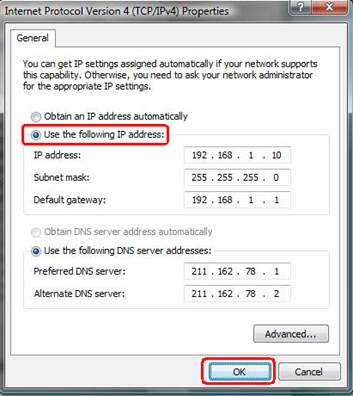
1) Select Use the following IP address, as shown in the following figure.
If the router’s LAN IP address is 192.168.1.1, please type in IP address 192.168.1.x (x is from 2 to 253), subnet mask 255.255.255.0, and default gateway 192.168.1.1.
2) Select Use the following DNS server addresses, as shown in the following figure. And then type the DNS server IP address, which should be provided by your ISP. Finally remember to click OK to save settings.
Note: In most cases, type your local area DNS server IP addresses into it.
The Preferred DNS server is same to default gateway. For Secondary DNS server, you could leave it blank or type in 8.8.8.8.
Step 5
Click OK to save and apply your settings.
For Windows Vista & Windows 7
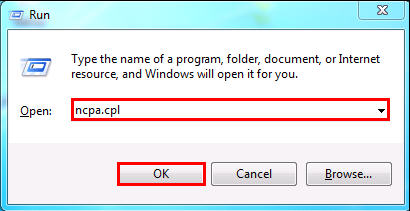
Step 1
Click on windows key+ R key on the keyboard at the same time.
Step 2
Type ncpa.cpl in the box, then press OK.
Step 3
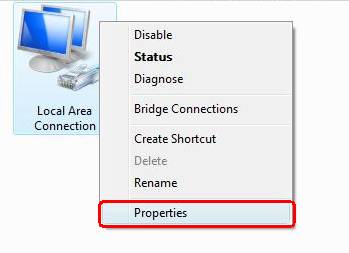
Select the local area connection, right click it and select Properties.
Step 4
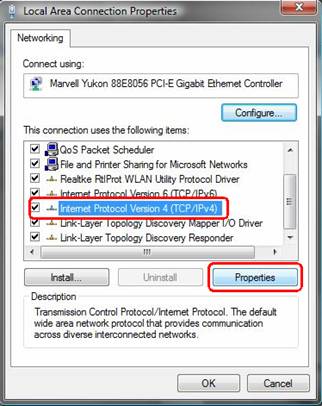
Select Internet Protocol Version 4(TCP/IPv4), double click it or click Properties.
Step 5
There are two ways to configure the TCP/IP Properties, Assigned by DHCP server automatically or manually.
1. Assigned by DHCP server
Select Obtain an IP address automatically and Obtain DNS server address automatically. If necessary, then click OK to save the settings.
2. Assigned manually
1) Select Use the following IP address, type IP address, subnet mask and default gateway IP address into it.
If the router’s LAN IP address is 192.168.1.1, please type in IP address 192.168.1.x (x is from 2 to 253), subnet mask 255.255.255.0, and default gateway 192.168.1.1.
2) Select Use the following DNS server addresses, as shown in the following figure. And then type the DNS server IP address, which should be provided by your ISP. If necessary, then click OK to save the settings.
Note: In most cases, type your local area DNS server IP addresses into it.
The Preferred DNS server is same to default gateway. For Secondary DNS server, you could leave it blank or type in 8.8.8.8.
Step 6
Click OK to save and apply your settings.
Step1
Click on the Windows Key on your Keyboard and Press X. On the menu that appears click control panel.
 + ‘X’
+ ‘X’
Step 2
In Category view click on Network and Internet

Step 3
Click on Network and Sharing Center

Step 4
Click on Change Adapter Settings

Step 5
Right click on Local Area Connection and click Properties

Step 6
Click Internet Protocol Version 4 (TCP/IP) then click Properties

.
Step 7 Change ‘Dot’ to Use the following IP address and input your IP and DNS information.

Step 8:
Click OK to save and apply your settings.
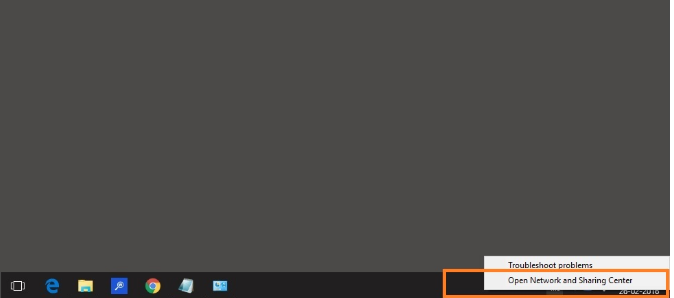
For Windows 10:
Step 1
Right click the internet icon in the task tray, select Open Network and Sharing Center.
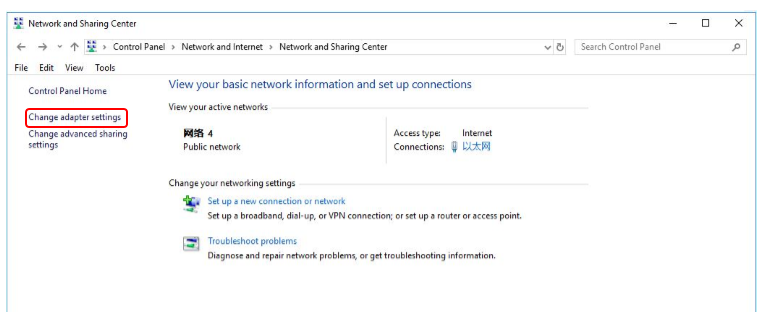
Step 2
Click Change adapter settings.
Step 3
Highlight and right click on Ethernet, then select Properties.
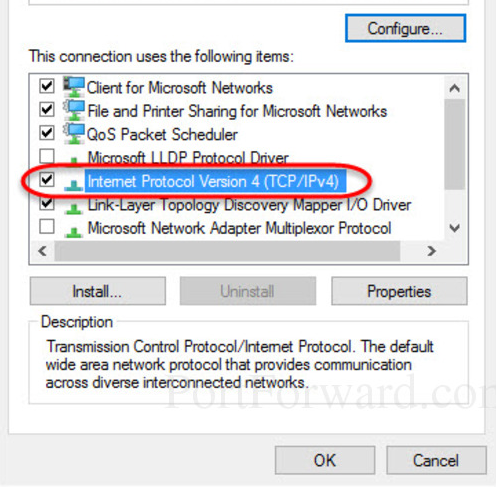
Step 4
Select Internet Protocol Version 4
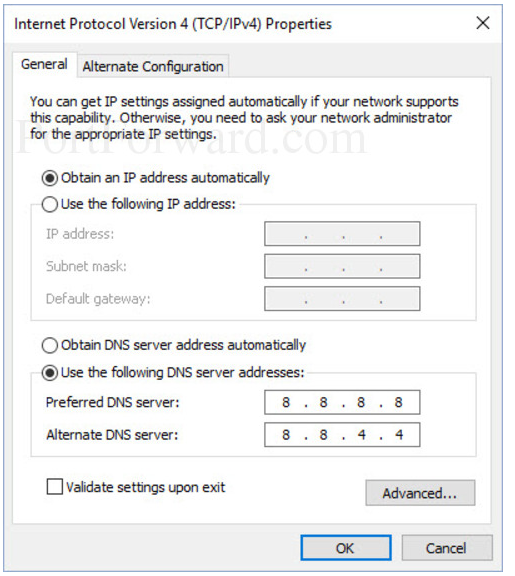
Step 5
To get IP settings assigned automatically, select Obtain an IP address automatically and Obtain DNS server address automatically.
To get fixed IP settings, select Use the following IP address and Use the following DNS server addresses, then enter the IP address, subnet mask, default gateway and DNS server manually.
Step 1
Click the Apple icon the click on System Preferences

Step 2
Click on Network

Step 3
Click on the Configure IPv4 field, and select ‘Manually”

Step 4
Input your IP information (Router is the Default Gatway address) and click Apply

Note:
1.DNS server should be provided by your ISP. Please contact with your ISP to check them.
2.In most cases, you could type your local area DNS server IP addresses into it. The DNS server is same to Router LAN IP address. In some cases, you could also leave it blank or type in 8.8.8.8.
No comments:
Post a Comment